Calculating Color Histogram of Image Tensor: OpenCV vs PyTorch
August 10, 2022 | 3 min read | 1,129 views
Color histograms are useful to get a sense of what a given image looks like. If you work on deep learning with PyTorch, you might sometimes want to calculate color histograms of image tensors. In this article, I will show you two ways to do it: OpenCV-based and PyTorch-based. As of August 2022, he PyTorch solution does not work on GPU.
Setups
First of all, I summarize the setups.
In the following part, all the code was run on Colaboratory with a Tesla T4 GPU.
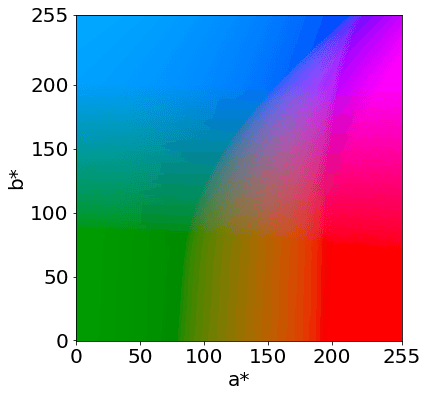
To calculate color historgram, you should be aware of which color space you are using. It can be RGB, HSV, Lab, or anything else, but here I chose Lab color space because it was designed to be perceptually uniform. The image below visualizes the Lab color space when the perceptual lightness L* is 127 (out of 255).
As a sample image, I used the following image generated by DALL-E (query I meant: “An oil painting by Mattise of cockatoos chatting over tea in Morocco”).
We can create an image tensor represented in Lab color space with the following snippet:
import cv2
import torch
from torchvision import transforms
from PIL import Image

from matplotlib import pyplot as plt

img = cv2.imread('sample.png')
img = cv2.cvtColor(img, cv2.COLOR_BGR2Lab)
X = torch.Tensor(img)
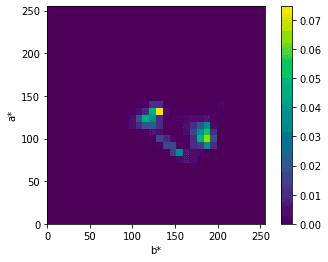
Once given a histogram algorithm, we can plot the result on the a*-b* plane like below:
###
# Calculate color histogram here
# histr = my_histogram(X)
###

fig, ax = plt.subplots(1,1)
im = ax.imshow(histr, extent=[0, 255, 0, 255])
ax.set_xlabel("b*")
ax.set_ylabel("a*")
fig.colorbar(im)
fig.show()
That’s it for the setups. Let’s move on to the calculating color histograms!
OpenCV
OpenCV supports the very solution. With the function calcHist, calculating color histogram is straightforward.
histr = cv2.calcHist([X.numpy()], channels=[1, 2], mask=None, histSize=[32, 32], ranges=[0,256, 0, 256])
histr /= histr.sum() # normalize sum to 1
The above snippet was executed in 5.25 ms. You can also pass a mask to the function.
PyTorch
PyTorch supports a function for calculating multi-dimensional histogram, which has the same interface as NumPy. You can pass an image tensor to the function histogramdd after flattening the spatial dimensions.
histr, _ = torch.histogramdd(X[:,:,1:].view(-1, 2), bins=[32,32], range=[0,256, 0, 256])
histr /= histr.sum() # normalize sum to 1
The above snippet was executed in 23.1 ms. OpenCV is superior in terms of speed, simplicity, and usefulness.
PyTorch on GPU
Can we expect a significant speed-up for the PyTorch solution on GPU? Unfortunately, it does not work at the time of this writing because the function torch.histogramdd for the CUDA backend is not supported by PyTorch v1.12 (the latest). If you call the function on a GPU, it will throw a NotImplementedError:
Click to expand
NotImplementedError: Could not run 'aten::_histogramdd_bin_edges' with arguments from the 'CUDA' backend. This could be because the operator doesn't exist for this backend, or was omitted during the selective/custom build process (if using custom build). If you are a Facebook employee using PyTorch on mobile, please visit https://fburl.com/ptmfixes for possible resolutions. 'aten::_histogramdd_bin_edges' is only available for these backends: [Dense, UNKNOWN_TENSOR_TYPE_ID, QuantizedXPU, UNKNOWN_TENSOR_TYPE_ID, UNKNOWN_TENSOR_TYPE_ID, UNKNOWN_TENSOR_TYPE_ID, UNKNOWN_TENSOR_TYPE_ID, UNKNOWN_TENSOR_TYPE_ID, SparseCPU, SparseCUDA, SparseHIP, UNKNOWN_TENSOR_TYPE_ID, UNKNOWN_TENSOR_TYPE_ID, UNKNOWN_TENSOR_TYPE_ID, SparseXPU, UNKNOWN_TENSOR_TYPE_ID, SparseVE, UNKNOWN_TENSOR_TYPE_ID, UNKNOWN_TENSOR_TYPE_ID, UNKNOWN_TENSOR_TYPE_ID, UNKNOWN_TENSOR_TYPE_ID, UNKNOWN_TENSOR_TYPE_ID, NestedTensorCUDA, UNKNOWN_TENSOR_TYPE_ID, UNKNOWN_TENSOR_TYPE_ID, UNKNOWN_TENSOR_TYPE_ID, UNKNOWN_TENSOR_TYPE_ID, UNKNOWN_TENSOR_TYPE_ID, UNKNOWN_TENSOR_TYPE_ID].There are already some feature requests to implement this function for the CUDA backend (here and here). I don’t know how to write CUDA codes, but if it can be extended from the GPU version of torch.histc function, it might not be too hard.
References
[1] torch.histogramdd — PyTorch 1.12 documentation
[2] torch.histc — PyTorch 1.12 documentation
[3] ヒストグラム その1: 計算して,プロットして,解析する !!! — OpenCV-Python Tutorials 1 documentation
[4] Lab* 色空間 | OpenCV を用いて Lab* 色空間を取り扱う方法
![[object Object]](/static/2d0f4e01d6e61412b3e92139e5695299/e9fba/profile-pic.png)
Written by Shion Honda. If you like this, please share!


